Easy to Draw Rabbit Head
Page 3 of 3

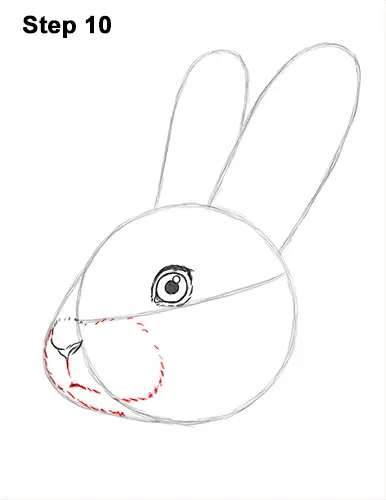
Step 10: Add the muzzle by first drawing a small line under the nose. Below that line, draw a small, curved line for the mouth. Break up the line farther to the right to indicate fur. Darken the path of the initial arc using a broken line to create the outside of the muzzle. Continue drawing the broken line to the right of the mouth and curve it upward. The right side of the rabbit's muzzle should curve toward the construction line and end at the bridge of the nose. Darken the lower edge of the initial arc using a broken line for the chin.

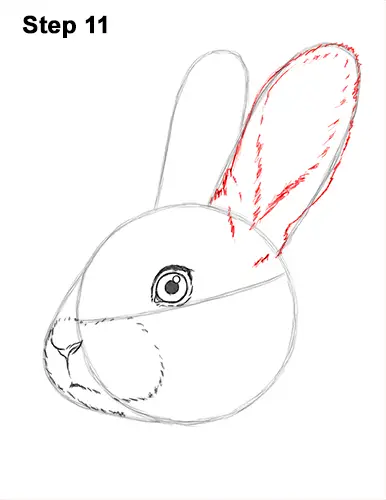
Step 11: Use the tall arc on the top, right side of the head as a guide to draw the rabbit's first ear. Use short strokes as you darken the path of the arc for a fur-like texture. As you add the strokes, make the shape of the ear a bit wider along the middle. Add a few lines made of short strokes inside the head, below the ear, for more fur. Inside the ear, add more short strokes as the furry edge of the ear's opening. These strokes should follow the basic path of the ear too, but the shape should be pointy at the bottom.

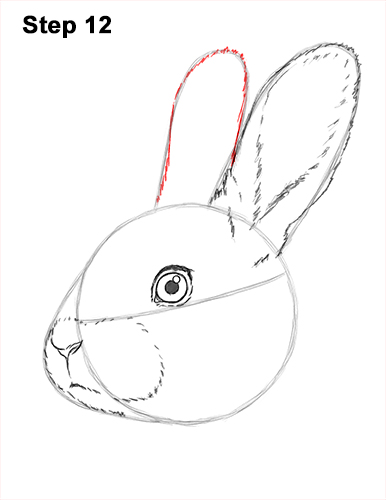
Step 12: Darken the arc on the left side using short strokes to create the rabbit's other ear. This ear is facing away, so don't draw the inside section.

Step 13: Use the main circle as a guide to draw the rest of the head. Use short strokes as you follow the basic path of the circle to create the shape of the head. Curve the top, left side of the head more to make the forehead more prominent. Notice how the top and left side of the head are flatter than the initial circle. The longer you make these strokes, the shaggier the rabbit's fur will be. The right side of the head should follow the path of the circle pretty closely and end at the chin.

Step 14: For a cleaner look, erase as much as you can of the initial guide lines. Don't worry about erasing all of the guides. It's okay to leave some behind. Re-draw any final sketch lines you may have accidentally erased.

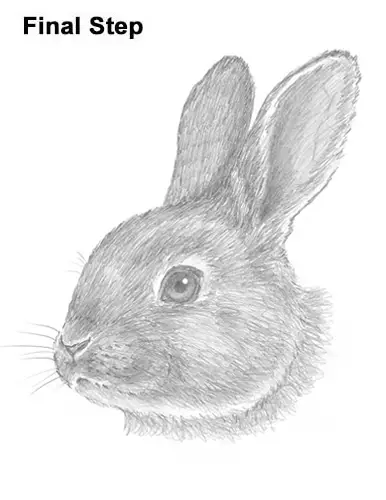
Final Step: Add some shading to your rabbit drawing for extra detail. When you shade the eye, make the top part dark and gradually make it darker toward the bottom. Add some shadows to the shapes to give the head more dimension and volume. Pick the direction of the light source so that the shadows are consistent with it. If the light is coming from the top, left, like it is here, then most of the shadows will be on the lower right side. Vary the pressure on your pencil to get different degrees of tonal value.
You can stop here for a white rabbit or continue adding value for a gray rabbit. Add a series of strokes around the eye and leave the section inside blank. To get a fur-like texture , you should shade using a lot of tiny individual strokes. This process is slow and takes a very long time, so be patient and take breaks. It gets faster with practice.
Use a smoother, more even type of shading for the inside of the ear. If the value you're using for the rabbit's fur gets too dark, just make the shadows darker too. As you shade the rest of the head, use strokes that go in the general direction of the fur. The strokes should basically radiate from the nose and to the left across the head. Separate each individual stroke a bit so that the white of the paper comes through and emphasizes the fur-like texture. Leave a small section around the rabbit's nose, mouth and bottom of the head blank.
Continue to add layers of strokes and shadows right on top of each other throughout the head. It's always a good idea to use reference for a more accurate drawing. If you have a pet rabbit, try to duplicate its fur pattern on your drawing. You can also give your rabbit a pattern on its fur like spots or even color it! Add some long strokes to the muzzle for whiskers. Don't forget to pause the video to draw at your own pace.
RELATED TUTORIALS
Source: https://how2drawanimals.com/8-animals/371-draw-rabbit-head.html?start=2
0 Response to "Easy to Draw Rabbit Head"
Post a Comment